June 17, 2025
The 250th Anniversary game of the Battle of Bunker Hill, photos:
37-48 (in reverse)


 18-27 (in reverse)


 28-37 (in reverse)


 47-56 (in reverse)


 65-71 (in reverese)


 56-65 (in reverse)


 April 24, 2025


My thanks to the players: Mike O. for backing out due to exposure to COVID and getting sick, Robert who also failed to make it but not sure why (was supposed to be British) - might have also been exposed, and to those who showed up on the day Alan, Brad (British), Mike W., Greg, Pete (British), Ix, and Jon.
After Action Report for 250th anniversary game of the battles of Lexington and Concord below.
But first, lots more painting done for AWI, I'm up to 50 foot units painted now, 41 game ready, 9 needing bases textured with 4 more units partially done - and the 4 long done cavalry units. Also now have completed 20 guns with crews and 17 leaders with 4 more partially done leaders. Solid progress. And just received figures to create 4 more rifle units for the Patriot side, just felt a need/desire for more. And those may be the last metal figures I order (and no plans for resin/plastic figures at all). Just can't think of anything else I need or want (more wild animals if anyone puts them out, especially gazelles for Africa, and more characterful figures for Pulp would tempt me). And one last order just placed for some 3D printed buildings and terrain but none specific to AWI. Need to create a photo record of all the new AWI units. Now, on with the AAR:
First point to note is that the 'units' were used as approximately company level formations for this game rather than as battalions, part of why the British get three units each of lights and grenadiers.
Next is to note that this website from the National Park Service: https://www.nps.gov/mima/learn/historyculture/april-19-1775-witness-houses.htm
was instrumental in developing my game plan - but see "Lessons Learned" at the end of this post.
First up are a LOT of pre-game photos just because I want the record to consult later.
Please understand that the buildings, though as close as I could get in some instances, are more representative than reproductions - I plan to use these buildings for a lot more than just this battle and far into the 19th century as well.
First up is a test to see if the 'burning' of Concord would photograph well - and it did, tea lights under lightly painted (not by me) cotton balls. And, of course, it wasn't the town burning but the 'contraband' found by the British.
This is Concord with the Old Manse at the top left and its 'twin' the Elisha Jones House at bottom right (twin in model used, no idea if the buildings were but doubtful). The other buildings were to just 'fill in' the town a bit.

The farthest reach of the British, 18 miles from Boston, was the Barrett house and farm seen at the bottom of the photo below. Near the road is the David Brown farm, the white one near the backdrop is the John Buttrick House, and then near the creek is the Ephraim and Willard house and farm. All these named buildings were taken from the site linked above.


The Nelson family houses: Josiah, Thomas, and Tabitha with the cattle pen (a more prosperous farm). Paul Revere was captured in this area - and Parker (militia leader at Lexington) got his 'revenge'.


Last house before getting back to Lexington is Jacob Whitmore's. A wee bit of Fiske Hill there on the left, yet another battle spot.


Some libations being served outside of Buckman Tavern.


So imagine a line of militia - the actual Massachusetts one - facing the camera just below the church at the top of the green and facing three times there number of regular British Light Infantry. We played out a couple of turns of movement and some firing. And then rolled dice to determine who fired the first shot - or not. As it turned out, based on the dice rolling, it was "incontrovertibly the British regulars" who fired "the shot heard round the world"!
The militia ended with 5 casualties and the British just 1. All three light infantry fired and then the militia fired three times, once at each opponent unit but only the smallest number 'stuck' . Sort of similar to the historical numbers if not precise.

To separate Lexington and Concord better I painted up an 'instant' backdrop from some foam core board and a bit of wood at the bottom - which still didn't keep it from blowing over in the wind on the day so had to use some weights/water bottles. Still worked. However, for some reason, the trees in the middle which I kept telling players they couldn't get through faster than 1/4" a turn, were always tempting certain players until I really emphasized that the table really needed to be turned on one side 180 degrees.
 A good shot of the left side of the table.
 And the right side of the table.
 From the far end of the table.
 And again on the right.


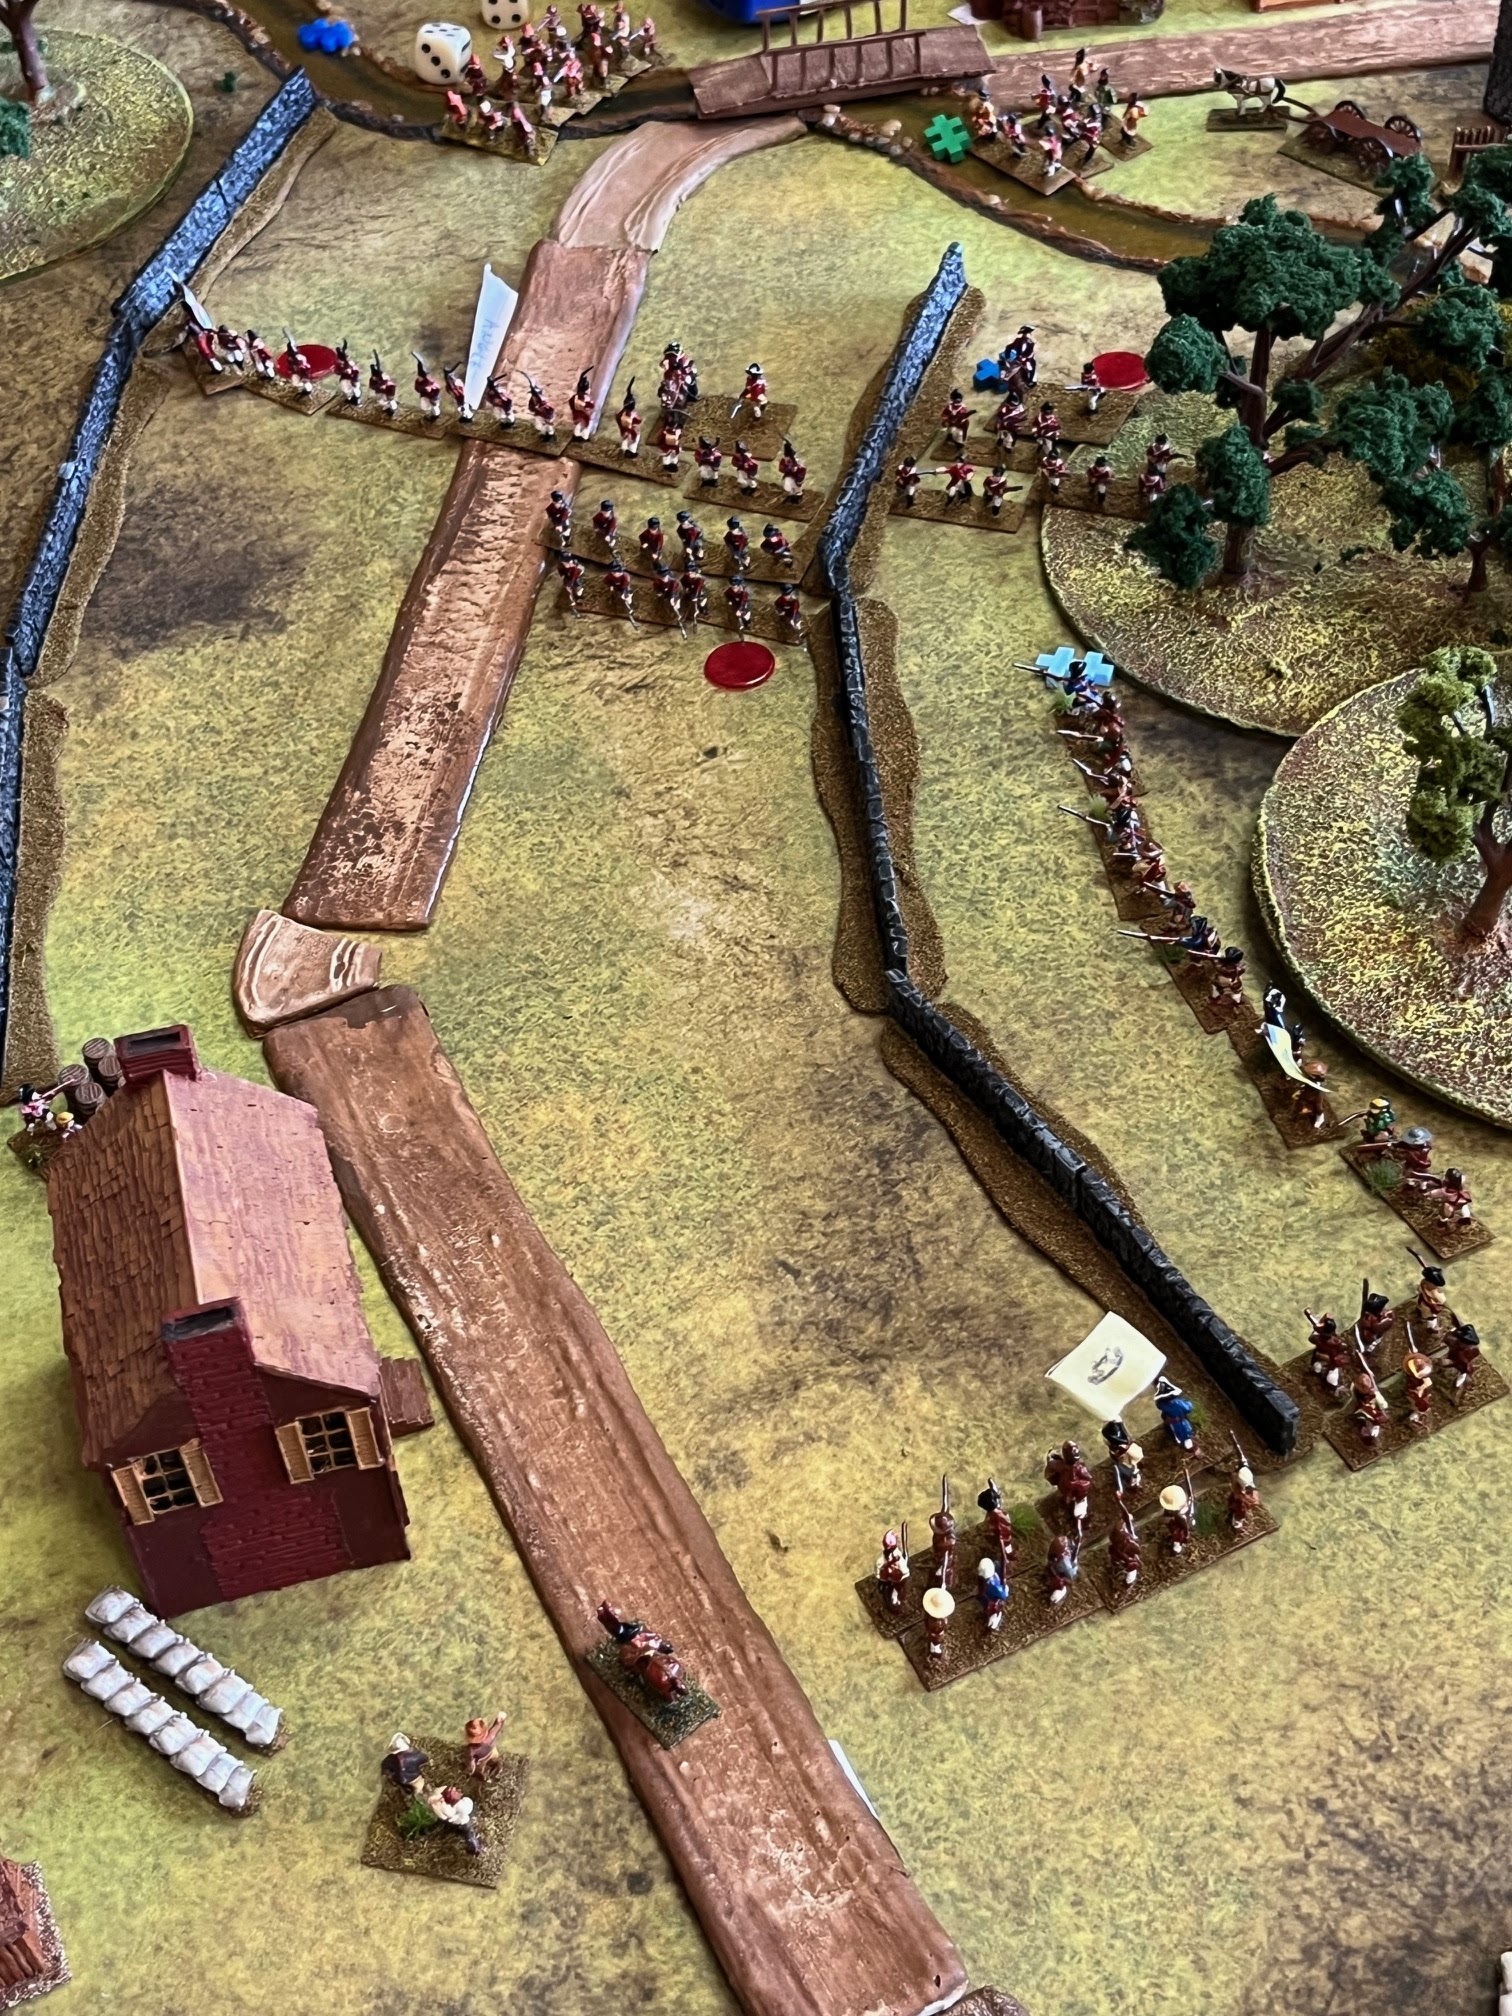
And, FINALLY, we get to the action of the game - and the 'burning of Concord'.


Just a centered shot from the same end.

The British got 3 units of light infantry, all at six stands and 3 units of grenadiers with one at six stands and two at eight stands. There were also four six stand battalions of regular infantry and two guns as the relief force that, alas, were not needed.

Punkatasset Hill with the first ten militia companies. There were a total of twenty painted (well, technically, 13 militia battalions, 4 extra continental units, and three more 'borrowed' militia units from my French and Indian War figures - even one or two meant to be French). While the total physical possible was only 20, I allowed militia to rejuvenate - and the British, too, in order to ensure all players could stay in the game as far as possible.

Here is a shot of the battle at North Bridge, the light infantry deploying on the far side and acting as a rear guard.

From the other side. The red discs represent casualty and three mean a morale check. Rules being Rank and File. One Special Rule I permitted was allowing the British only to use the March Move but be able to break contact and still use the double move to keep working back towards Boston (as much as 24" in a move).

The grenadiers were allowed to try and put out the fires to prevent the town catching fire - as they did historically - and got it done in two turns.

The light infantry pulling / being forced back from the bridge.

Then came a large number of militia near Meriam's Corner for the British to face.

Over on the right is a Blue Moon Conestoga wagon that I eventually moved along the road - otherwise it was just there for visual interest.

The militia crossing the bridge. Once the battle moved on, the militia 'leap frogged' to another location.

The grenadiers used their larger number of stands to effectively keep the escape route open, doing some fearsome 'execution'. In my mind, the militia took half the casualties as 'run aways', two thirds of the balance as wounded, and the last third (or sixth) as dead. The dark blue indicators show the start point of the charge, the light blue the target of the charge. This is the Meriam's Corner scrum.

Not sure if those stand lying down were casualties or just fell over.

A hand! The militia got hit hard here.

But the grenadiers almost broke into the woods - that is them in the center left at the bottom of the hill (top of the hill in the photo).

More militia showed up on Brooks Hill - top right beyond the road. At least we got a good taste of the gauntlet the British faced on the day.

And then came the militia in smaller numbers but on both sides of the wall and behind stone walls (not historic perhaps but a game master decision to help the militia a bit - they needed it!).

A lot of fighting going on here - note the green indicator on the right - that indicates that unit is Unsteady. At least five militia units routed off the board during the game (brown indicator).

The 'floating' wooden bridge - perhaps afraid of the tape measure? On the other side of the stream is the Bloody Angle. I made this stream fordable unlike the waterway at North Bridge. One of our players, Greg, visited the Battle Road just a couple months before the game.

The British working their way through. They actually did really good here.

Look carefully into the woods on the left below. The militia running for their lives!

But, of course, just more militia to face ahead. And this is as far as we got with the game on the day. Started a little after 10 AM with our Lexington Battle - a brief encounter as above and wrapped around 5:15. While some wanted to go on there were a few that drove over a hundred miles or so for the game who wanted to get home. So we stopped here.


In the end, the 40 total British infantry stands faced a total of 168 militia stands (28 units through rejuvenation). British lost 19 of 40 stands, militia lost 50 of 168 stands. Had to call the came for the militia. The one thing the British could have done to improve their end result, though only marginally as the game was constituted, was to move faster towards Boston. But as it was, the British did pretty darn good against overwhelming odds. Just not good enough. Oh, and the GM, yours truly, was kind and allowed two of the three grenadier units that were only down to two stands each to amalgamate back up to one four stand units right at the first turn into the Bloody Angle. British had Veteran morale, militia had green morale. And I added that the British started with super morale, a d12, and the militia started with d6 morale but the British went down as the game progressed and the militia went up, ended with British at d10 but could have gone down to d6, militia ended at d8 but could have gone up to d12. Normal rules are d6 morale, author approved to use d8 so this was a significant departure from the basic rules.
While there were things that could have gone different and see below for possible improvements, I'd call the day a success and worth all the effort I put into it. Seemed everyone had a good time and I got A LOT done for the day, finished painting 4 battalions, fully painted 14 more battalions plus additional guns and leaders and nearly two dozen buildings painted besides another 15 outhouses and covered wells to get to the total of 60 roofed structures for the game - and the quickie backdrop.
By far and away, the most important "Lesson Learned" after playing the game is that it would have been far better to amalgamate the 'battle spots' rather than try to fight them all out. I had them as Lexington Green, of course, but then all of these as well, working back from Concord towards Boston: North Bridge, Meriam's Corner, Brook's Hill, The Bloody Angle (two spots, really), The Fight Through Lincoln, Parker's Revenge, The Bluff, Battle at Fiske Hill, and finishing with the fighting near Menotonomy. That is ten or maybe eleven 'battles' within the overall game, eleven if it got as far as Menotonomy.
Were I do to it again I would do the North Bridge on its own, combine Meriam's Corner and Brook's Hill, combine the Bloody Angle(s) with the Fight through Lincoln, and combine Parker's Revenge, the Bluff, and the Battle at Fiske Hill - and then finish with the fight beyond Menotonomy if needed. And, naturally, still do Lexington Green. That is only four and maybe five 'battles' which I believe would have yielded a better game and gotten a lot closer to the full days events.
Another difference would have been to better balance the forces to give the British a better fighting chance - at least until Menotonomy at which point they would have faced overwhelming odds for sure.
One last change I'd make is to keep it at a five player game, two British and three militia; I think that would be more ideal.
While I like to believe I might have gotten there on those changes if my wife had not broken her arm on the Monday ahead of the game and costing me about ten hours of prep time, I really have no idea if I would have done it differently. But if I play it again, absolutely use the four or five battles variation and fewer players.
So there you have it, my variation on the Battles of Lexington and Concord on the actual 250th anniversary. Huzzah!!!
December 29, 2024
Really been making progress on painting AWI figures, just finished four French regiments except for flocking bases - and another four well in progress. Here is a photo:
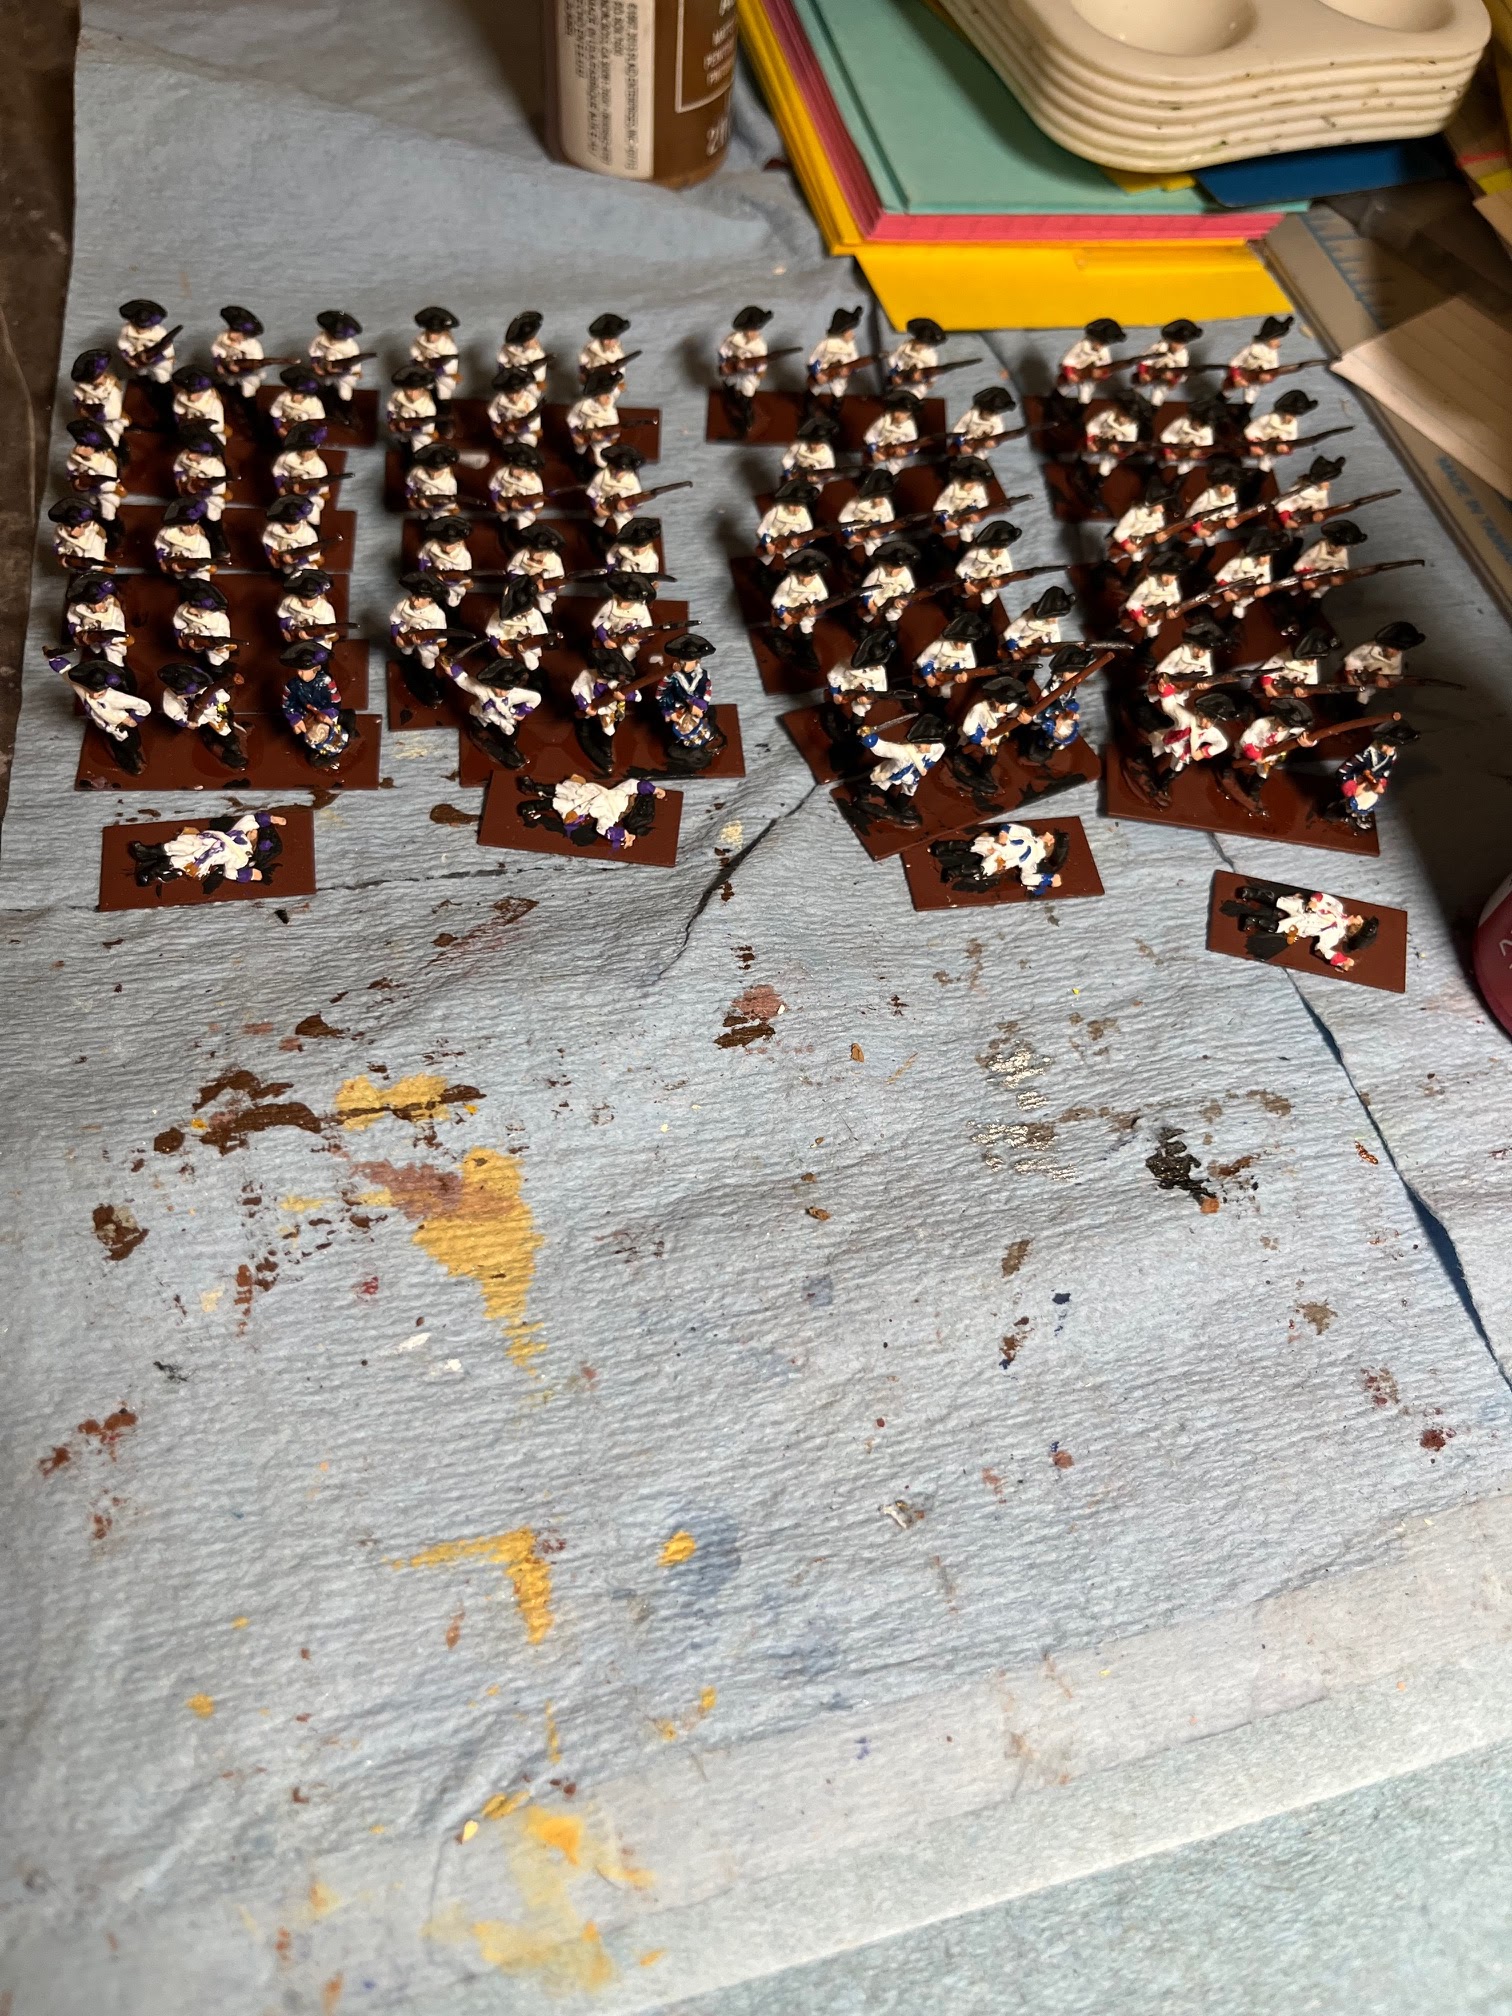
Once those other four French regiments are complete, I will be up to 34 battalions. More photos when time permits.
February 2, 2023
Been a while but a bit of progress made. All of the militia, one battalion per colony/state, is primed and ready to paint as are my four units of the Extra Continentals. Another 36 more battalions and some of that 'extra' stuff is going to get prepped and primed very soon. That will take me to the half way point of having all infantry primed. I am going to make a major push on this collection this year with the goal of having enough figures ready to start playing the battles of the war by the time the 250th anniversary rolls around.
August 2, 2020
Didn't get anything primed this weekend but I did get the entire group of figures set for the next few rounds of priming washed and added a casualty figure to each battalion plus added the necessary artillery and command figures. Still need to do some filing prior to gluing to painting strips. The list: 13 battalions of militia, 20 battalions of loyalists, 4 extra continentals, 8 additional continentals, 6 light infantry, and 2 legion foot, plus I washed the additional 6 figures for the British unit of all pioneers meant primarily for the Burgoyne campaign.
The big challenge is going to be storing so many primed figures once I have it all primed. In fact, I am starting to think I might need to get the first half of the figures painted and based before moving on to the second half. However, once all of the above is primed and ready I will be on the downhill slope with this collection since I will only have the remaining infantry battalions plus some added civilian figures including mounted civilians and limbers. That is still a huge number of figures but at least on the right side of the midpoint.
July 27, 2020
All those figures in an earlier photo are now primed as are half of the German infantry, and all of the German artillery and generals. And, posting today - though primed yesterday, are the other half of the German infantry, another 15 battalions:
 The three right most battalions are part of Burgoyne's Brunswick command. Mixed in the other two boxes are a unit from Hesse Hanau, the Ansbach and Bayreuth battalions, and the Waldeck battalion. The rest are Hesse Cassel battalions.
Next up will be the patriot militia, 13 battalions, followed by the loyalists, 20 battalions.
March 8, 2020
Not nearly enough painting getting done on this collection but more work on the priming side, 15 German units are now primed as are, I believe, all the generals and artillery, which leaves another 15 regiments to prep and prime. At least the main distractions from progress on this collection is progress on other of my miniature collections.
September 7, 2019
Been working on the various German troops as far as assigning the leaders and sorting out the guns.
Hesse-Cassel commanders will be Knyphausen and von Heister (probably) with von Bose and Mirbach as wing commanders.
Brigades will break down as follows:
von Donop over the grenadiers: von Lingsingen, von Block, von Minnegerode
von Rall over the Trenton brigade: von Rall's grenadiers, von Knyphausen fusiliers, and von Lossberg Fusiliers.
Stirn's brigade: von Donop musketeers, von Mirbach musketeers, and Erbprinz fusiliers.
Lossberg's brigade: Prinz Carl musketeers, von Trumbach musketeers, and von Ditfurth fusiliers.
Kospoth garrison brigade: Landgraf musketeers, von Huyn garrison regiment, von Stein garrison regiment.
Loos' brigade: von Kohler grenadiers, Wissenbach garrison regiment (fusiliers).
Lt. Col Wurmb's jager corps: 1st jager company, 2nd jager company, 3rd jager company.
Capt. Ewald's jager corps: 4th jager companey, 5th jager companay, Anspach-Bayreuth jager company.
Ludwig Albrecht von Eyb's brigade: Anspach musketeers, Bayreuth musketeers, Waldeck musketeers.
For Brunswick forces with Burgoyne the commander is Riedesel.
Brunswick advanced corps under von Gall (of Hesse-Hanau): Breyman's Grenadiers, von Barner's Chasseurs (including Hesse-Hanau jagers), and Gersau's jagers
Brunswick brigade under Specht: von Specht musketeers, von Riedesel musketeers, von Rhetz musketeers, and Erbprinz musketeers of Hesse-Hanau.
Baum over the Brunswick light dragoons and the mounted jagers.
Of course, while broadly historical, the above varies in slight ways from history to accommodate my collection of figures.
There will be six 12 pound guns with their crews, five 6# guns with their crews, and one howitzer with its crew. They will break down into Hesse-Cassel, Brunswick, Ansbach, and Hesse-Hanau but I haven't finalized that yet.
Next project is to prep 18 of the German infantry units and, maybe, all of the artillery and generals for the 'mercenaries'. If I get that done, then there will only be 12 more infantry units to prep.
Then it will be on to the main antagonists: The Continentals and militia versus the British troops.
August 4, 2019
Here is a photo of the foot; it is my Franco-Spanish Division:

I'm getting close to 1500 figures ready to paint or in process out of the total. By the way, the totals have gone up from below because of some study of the orders of battle, Brandywine in particular. For that battle I want all known units in my collection and that meant adding a few units - and avoiding using 'stand ins'.
Edit: And before the sun set they all got primed - and not long beyond sun set they were dry enough to place on trays and put into cabinets awaiting brush and paint to meet primed metal. Primer dries fast when the temperature is north of 90 degree fahrenheit!
---
Well, I got back to tabulating this collection after some additions courtesy of some releases from Peter Pig and a re-release of some Stone Mountain AWI figures. And here is the new tally: 3,312 infantry with 200 casualty figures; 240 cavalry (as below post on the 20th) with 20 casualty figures ; 97 mounted command figures and 97 horses with 97 foot figures (one of whom is a woman) - no casualty figures; 192 artillery crewmen including 16 'extras' and 44 artillery pieces and 16 limbers with 16 horses and 16 men with 51 casualty figures (which means a few extra); the two scout units work out having 24 men and 12 horses and 2 casualty figures; the pioneers and corps of invalids total 30 men and 2 casualty figures; and finally there are 99 civilians (31 women) and 12 horses with 5 casualty figures.
At long last, I've started working on this collection. All 20 cavalry regiments are prepped and primed for painting and all of the men have their base skin tones applied already, next will be a wash on the skin tones and then the base colors on the horses. Works out at 531 men and 269 horses - the odd numbers come with the horse holders, 31 men, 29 horses; 20 of the men are dead/casualty figures. There are 240 mounted men and 240 dismounted men. Even though I will be using horse holders - something that changed - I won't reduce fighting strength when dismounted (unless there are stand losses within the game or as part of a scenario).
Tallies, Somewhat Belated
Imagine being relieved by having fewer figures than you thought? Yes? No? For me, very much yes. I suspected I had a bit over 5,000 pieces for this collection but it turns out the number is a bit lower. That means fewer figures to paint! Oh, what a relief.
So, here it is: 3,940 Men, 16 Women, 360 Horses, 44 Cannons, 240 Men as dismounts for mounted, and 264 Casualty figures for a great and grand total of 4,864. Life is good.
1800 infantry for the 'good guys' and 1458 foot for the 'imperial horde'. Imagine that many figures on the table! Okay, maybe not. But I will be doing the full battle of Brandywine at some point.
20 guns, 96 dismounts, 120 casualties, 142 horses = 378 + 1806 = 2184 total pieces
June 7, 2012
Okay, yes, I am reproducing in a public place potential evidence that I exist in an unbalanced mental state - but maybe we off balance folk are just having more fun! The evidence below.
If I had to abandon all put one of the many periods I have figures for - I'd shoot the person making such a dastardly suggestion! (maybe with a water gun, but I'd shoot the cad nonetheless) However, if I had to pick one period as my most favorite it'd probably be the American Revolution. The listing below reveals just how much I enjoy the period. Whether they will ever all get painted is another question all together.
Note that each battalion of infantry is eighteen figures and including command; each cavalry regiment consists of twelve mounted figures and twelve matching figures on foot; each gun is a model of a gun and four crewmen; all generals are represented by one mounted figure and one figure on foot - the foot figure indicating the rank of the general (who might not be an "actual" general, of course). For purposes of organization, I have everything in brigades of four battalions of infantry, two regiments of cavalry; the infantry brigades get a gun each and, of course, all the brigades get a commanding figure. And even though there were not divisions per se during this era, I have higher level "divisions" of four brigades each except for the two German ones which are three brigades each.
A couple of other things - I have some available alternative generals for the higher levels of command for various theaters and what if scenarios and/or campaigns. Also, while I list specific units - almost all of which I have a color image of to use as a guide when painting - any unit can be used as some other unit for historical scenarios. And a close examination will reveal I can cover all the theaters of the war. Lastly, one of the reasons for this list - and this blog - is evidence to support any insurance claim if some disaster were to befall my collection. (nasty shivering shudder typing that, I can tell you)
The Continental Side:
Northern Division -
1st Brigade: 2nd New Hampshire, Green Mountain Boys, 2nd Canadian, Sargent's Massachusetts
2nd Brigade: Patterson's Massachusetts, 3rd Massachusetts, 6th Massachusetts, 8th Massachusetts
3rd Brigade: 14th Massachusetts, 1st Connecticut, 8th Connecticut, 1st Rhode Island
Northern Militia: Battalion A-NH, Battalion B-Mass, Battalion C-Conn, Battalion D-R.Island
Central Division -
1st Brigade: 2nd New York, 3rd New York, 1779 New York, 1779 New Jersey
2nd Brigade: 3rd New Jersey, alternate 3rd New Jersey (2nd?), 7th Pennsylvania, 1779 Pennsylvania
3rd Brigade: 3rd Pennsylvania, 1st Maryland, 2nd Maryland, Haslet's Delaware
Central Militia: Battalion E-NY, Battalion F-NJ, Battalion G-Pennsy, Battalion H-Maryland
Southern Division -
1st Brigade: 6th Virginia, Virginia Marines (9th), 1779 Virginia Continentals, 1779 North Carolina
2nd Brigade: 2nd North Carolina, 3rd North Carolina, 1st South Carolina, 2nd South Carolina
3rd Brigade: 1st Georgia, Sumpter's Partisans, Marion's Partisans, Picken's Partisans
Southern Militia: Battalion I-Virginia, Battalion J-NC, Battalion K-SC, Battalion M-Georgia
Additional Continetnals and Western Division -
1st Brigade: Lee's, Henley's, Hartley's, Webb's Additional Continental Regiments
2nd Brigade: Sherburne's, Spencer's Additionals, Lee's Legion Foot, Pulaski's Legion Foot
3rd Brigade: Morgan's Rifles, Pennsylvania Rifles, Over-mountain Rifles, undecided Rifles
Western Brigade: Crockett's Battalion, Clark's Illinois Regiment, 8th Pennsylvania, 13th Virginia
Light Infantry and French Division -
First Light Infantry Brigade: 1st Lights, 2nd Lights, 3rd Lights, 4th Lights
Second Light Infantry Brigade: 5th Ligths, 6th Lights, 7th Lights, 8th Lights
French Elite Brigade: Soissons Grenadiers, Galvan's Grenadiers(spain), Chasseurs, Lauzan's Lights
French Foot Brigade: Saintonge, Royal Deux-Ponts, Bourbonnois, undecided (where's my Mollo?)
Cavalry Brigades:
1st and 2nd Continental Light Dragoons - two regiments
3rd and 4th Continental Light Dragoons - two regiments
Lee's Legion Cavalry and Pulaski's Legion Cavalry - two regiments
Philadelphia Light Horse and Washington's Life Guard with von Heer's Corps attached - two regiments
Lauzan's Hussars and Belzunc Dragoons - two regiments
The British Side:
Elite British Division:
Guard's Brigade: 1st Guards, 2nd Guards, Converged Guards Flankers Battalion, 24th Foot
Grenadier Brigade: 1st Grenadiers, 2nd Grenadiers, Highland Grenadiers, undecided Grenadiers
Light Infantry Briagde: 1st Light Infantry, 2nd Light Infantry, Highland Lights, Burgoyne's Lights
Highland Brigade: 42nd Foot, 1st of the 71st, 2nd of the 71st, Royal Highland Emigrants (provincials)
British Line Division:
1st Line Brigade: 33rd Foot, 37th Foot, 43rd Foot, 64th Foot
2nd Line Brigade: 4th Foot, 10th Foot, 35th Foot, 63rd Foot
3rd Line Brigade: 17th Foot, 23rd Fusiliers, 40th Foot, 49th Foot
Burgoyne's Brigade: 9th Foot, 20th Foot, 21st Fusiliers, 62nd Foot
Elite German Division:
Grenadier Brigade: von Linsigen Grend, von Minnegerode Grend, von Rall Grend, Burgoyne's Grend
Light Brigade: Hess Jaegers, Hess and Others Jaegers, von Barner's Chasseurs, Burgoyne's Jaegers
Brunswick Brigade: Erbprinz (H-Hanau), Riedesel Musk, Specht Musk, Rhetz Musketeers
German Line Division:
First Musketter Brigade: von Trumbach, Prinz Carl, von Donop, von Mirbach
Second Musketeer Brigade: Brandenburg, Anspach, Waldeck, von Huyn Garrison Regt.
Fusilier Brigade: von Ditfurth, Erbprinz(H-Cassel), von Lossberg, von Kyphausen
Loyalist Division:
Northern Loyalists: Delancey's, King's American Regiment, NJ Volunteers, Prince of Wales
Central Loyalists: New York Volunteers, Volunteers of Ireland, Tory Militia, Tory Militia
Southern Loyalists: Queen's Rangers Foot, British Legion Foot, QR & Ferguson Rifles, NC Highland
Burgoyne's Loyalists: Butler's Rangers, King's Orange Rangers, Loyal Rangers, Kings Loyal Regt/NY
Cavalry Brigades:
16th and 17th Light Dragoons - two regiments
Mounted Highlanders and King's American Dragoons - two regiments
British Legion Cavalry and Queen's Rangers Cavalry - two regiments
Mounted Jaegers and Prinze Ludwig Dragoons - two regiments.
-----------
Yes, I know some of the cavalry were not in regimental strength but I wanted more cavalry than is usual - for hypothetical events I want to game one day.
Now I need to start deciding on what generals I want to represent - besides the obvious. And one last thing to add - with the addition of two dozen more casualty figures, I will have one casualty figure for every unit, each infantry battalion, each cavalry regiment, and each artillery piece; these will be used as indicators using my own unique system that I'll share one day. More later, pictures probably a lot later - unless you want to see unpainted figures.
Oh, for those who care, the vast majority - but not all - of the infantry comes from Musket Miniatures and the vast majority of the cavalry - but, again, not all - comes from Freikorps courtesy of QRF (and, thanks Geoff, for the help).
While editing, these thoughts - yes, I actually already own all these figures (just need the mentioned casualty figures). And I tried to balance the Continental figures to match, to some degree, the proportions each state supplied.
August 2, 2020
Didn't get anything primed this weekend but I did get the entire group of figures set for the next few rounds of priming washed and added a casualty figure to each battalion plus added the necessary artillery and command figures. Still need to do some filing prior to gluing to painting strips. The list: 13 battalions of militia, 20 battalions of loyalists, 4 extra continentals, 8 additional continentals, 6 light infantry, and 2 legion foot, plus I washed the additional 6 figures for the British unit of all pioneers meant primarily for the Burgoyne campaign.
The big challenge is going to be storing so many primed figures once I have it all primed. In fact, I am starting to think I might need to get the first half of the figures painted and based before moving on to the second half. However, once all of the above is primed and ready I will be on the downhill slope with this collection since I will only have the remaining infantry battalions plus some added civilian figures including mounted civilians and limbers. That is still a huge number of figures but at least on the right side of the midpoint.
July 27, 2020
All those figures in an earlier photo are now primed as are half of the German infantry, and all of the German artillery and generals. And, posting today - though primed yesterday, are the other half of the German infantry, another 15 battalions:

Next up will be the patriot militia, 13 battalions, followed by the loyalists, 20 battalions.
March 8, 2020
Not nearly enough painting getting done on this collection but more work on the priming side, 15 German units are now primed as are, I believe, all the generals and artillery, which leaves another 15 regiments to prep and prime. At least the main distractions from progress on this collection is progress on other of my miniature collections.
September 7, 2019
Been working on the various German troops as far as assigning the leaders and sorting out the guns.
Hesse-Cassel commanders will be Knyphausen and von Heister (probably) with von Bose and Mirbach as wing commanders.
Brigades will break down as follows:
von Donop over the grenadiers: von Lingsingen, von Block, von Minnegerode
von Rall over the Trenton brigade: von Rall's grenadiers, von Knyphausen fusiliers, and von Lossberg Fusiliers.
Stirn's brigade: von Donop musketeers, von Mirbach musketeers, and Erbprinz fusiliers.
Lossberg's brigade: Prinz Carl musketeers, von Trumbach musketeers, and von Ditfurth fusiliers.
Kospoth garrison brigade: Landgraf musketeers, von Huyn garrison regiment, von Stein garrison regiment.
Loos' brigade: von Kohler grenadiers, Wissenbach garrison regiment (fusiliers).
Lt. Col Wurmb's jager corps: 1st jager company, 2nd jager company, 3rd jager company.
Capt. Ewald's jager corps: 4th jager companey, 5th jager companay, Anspach-Bayreuth jager company.
Ludwig Albrecht von Eyb's brigade: Anspach musketeers, Bayreuth musketeers, Waldeck musketeers.
For Brunswick forces with Burgoyne the commander is Riedesel.
Brunswick advanced corps under von Gall (of Hesse-Hanau): Breyman's Grenadiers, von Barner's Chasseurs (including Hesse-Hanau jagers), and Gersau's jagers
Brunswick brigade under Specht: von Specht musketeers, von Riedesel musketeers, von Rhetz musketeers, and Erbprinz musketeers of Hesse-Hanau.
Baum over the Brunswick light dragoons and the mounted jagers.
Of course, while broadly historical, the above varies in slight ways from history to accommodate my collection of figures.
There will be six 12 pound guns with their crews, five 6# guns with their crews, and one howitzer with its crew. They will break down into Hesse-Cassel, Brunswick, Ansbach, and Hesse-Hanau but I haven't finalized that yet.
Next project is to prep 18 of the German infantry units and, maybe, all of the artillery and generals for the 'mercenaries'. If I get that done, then there will only be 12 more infantry units to prep.
Then it will be on to the main antagonists: The Continentals and militia versus the British troops.
August 4, 2019
Now that I've recovered access to this blog, I can post progress - elsewhere is evidence I've prepped and primed all 20 cavalry units and four of them are about half way painted, two thirds of the limbers and mounted civilians are the same with those that are not new additions. Most of the civilians on foot (all?) are primed and ready for paint. And, now, 17 units of infantry, 11 pieces of artillery with their crews, 28 casualties, and 8 generals are based and the glue is drying so they can be primed this day - a total of 413 pieces including the guns and the general's horses.
Here is a photo of the foot; it is my Franco-Spanish Division:

All the Spanish are on the left with Bernardo de Galvez up front and a field gun for his brigade behind him and then grenadiers, two line battalions, and a militia battalion. Still sorting out the specific Spanish units.
The two 'columns' two the right are the French.
My seven French generals: Lt. Gen. Rochambeau, MG Gabriel, Baron de Viomenil; MG Hyacinthe, Comte Viomenil; MG St. Simon, Marquis; BG Marquis Cloisy, Colonel Duc de Lauzan, and - of course - Marquis de Lafayette.
The guns for the French are 2 siege, 4 field, and 4 light.
The French foot battalions: 1st brigade- Bourbonnais, Royal Deux-Ponts, Soissonois, Saintogne x 2, 2nd brigade- Agenois, Gatinois, Touraine, Marines, and Marines. The 'elite' brigade- grenadiers from Rochambeua's command, grenadiers from St. Simon's command, Lauzan's lights, and a unit of chasseurs from St. Simon's command.
Two of the four cavalry under way are the Belzunce Dragoons and Lauzan's Hussars.
I'm getting close to 1500 figures ready to paint or in process out of the total. By the way, the totals have gone up from below because of some study of the orders of battle, Brandywine in particular. For that battle I want all known units in my collection and that meant adding a few units - and avoiding using 'stand ins'.
Edit: And before the sun set they all got primed - and not long beyond sun set they were dry enough to place on trays and put into cabinets awaiting brush and paint to meet primed metal. Primer dries fast when the temperature is north of 90 degree fahrenheit!
February 23, 2017
Well, I got back to tabulating this collection after some additions courtesy of some releases from Peter Pig and a re-release of some Stone Mountain AWI figures. And here is the new tally: 3,312 infantry with 200 casualty figures; 240 cavalry (as below post on the 20th) with 20 casualty figures ; 97 mounted command figures and 97 horses with 97 foot figures (one of whom is a woman) - no casualty figures; 192 artillery crewmen including 16 'extras' and 44 artillery pieces and 16 limbers with 16 horses and 16 men with 51 casualty figures (which means a few extra); the two scout units work out having 24 men and 12 horses and 2 casualty figures; the pioneers and corps of invalids total 30 men and 2 casualty figures; and finally there are 99 civilians (31 women) and 12 horses with 5 casualty figures.
So 4,071 men and 32 women plus the 271 dismounted men, 402 horses, 56 pieces of equipment, and 271 dead. That all adds up to 5,103 pieces. So, over 5,000 after all. And here's the real rub - I might choose to add more figures but if I do they will just be casualty figures for the command but maybe not. What is more likely is that I might replace a lot of the artillery pieces with better models since too many of them were 'catch-as-catch-can' purchases and maybe add guns for those 16 extra crewmen so 4 more guns. Only time will tell.
Besides all of the cavalry, the limbers, the extra artillery crews, the scouts, the pioneers and invalids, and the civilians are all primed and ready for paint - that's 245 figures. And that means that over 1,000 of the total are already in process. Only a tiny bit below 80% to go. Level bayonets, at the quick step...charge!
February 20, 2017
At long last, I've started working on this collection. All 20 cavalry regiments are prepped and primed for painting and all of the men have their base skin tones applied already, next will be a wash on the skin tones and then the base colors on the horses. Works out at 531 men and 269 horses - the odd numbers come with the horse holders, 31 men, 29 horses; 20 of the men are dead/casualty figures. There are 240 mounted men and 240 dismounted men. Even though I will be using horse holders - something that changed - I won't reduce fighting strength when dismounted (unless there are stand losses within the game or as part of a scenario).
October 9, 2014
Tallies, Somewhat Belated
Imagine being relieved by having fewer figures than you thought? Yes? No? For me, very much yes. I suspected I had a bit over 5,000 pieces for this collection but it turns out the number is a bit lower. That means fewer figures to paint! Oh, what a relief.
So, here it is: 3,940 Men, 16 Women, 360 Horses, 44 Cannons, 240 Men as dismounts for mounted, and 264 Casualty figures for a great and grand total of 4,864. Life is good.
1800 infantry for the 'good guys' and 1458 foot for the 'imperial horde'. Imagine that many figures on the table! Okay, maybe not. But I will be doing the full battle of Brandywine at some point.
May 23, 2014
The Penultimate "Organizational" Post
Below is the final organizational posting for my American Revolution figure collection - and every thing, save one last pack on order at the local hobby shop, is already awaiting being worked on in my well organized lead mountain. Sure, there will be some annotations to this post over time as indicated in the notes included. But this is it:
ORGANIZATION OF MY AMERICAN REVOLUTION MINIATURE FORCES
THE AMERICANS AND ALLIED
Additional Regiments:
Grayson-(V,My,D), Hartley-(P,My,D), Jackson-(Mass), Lee-(Mass)
Patton-(P,NJ,D), Sherburne-(RI,C), Spencer-(NJ,P), Webb-(C) 144 men
Extra Regiments:
Green Mountain Boys, 2nd Canadian, German Battalion, Maryland and Virginia Rifle Regiment 72 men
Light Infantry:
1st Brigade - Peter Muhlenberg
Vose’s-1-8 Mass; Gimat’s-9-10 Mass, 1 RI, 1-5 Conn; Barber-1-2 NR, Canada, 1-2 NJ + 3 coys NJ line
2nd Brigade - Moses Hazen
Canadian Regiment; Scamell-3 coys Conn, 3 coys Mass, 2 coys NH; Hamilton-1-2 NY, 2 coys Conn 108 men
Continentals:
Northern Division
1st Brigade -
New Hampshire, New Hampshire, Rhode Island, Connecticut
2nd Brigade -
Connecticut, Connecticut, Connecticut, Connecticut
3rd Brigade (at 24 figures each) -
Massachusetts, Massachusetts, Massachusetts, Massachusetts
4th Brigade (at 24 figures each) -
Massachusetts, Massachusetts, Massachusetts, Massachusetts 336 men
Central Division
1st Brigade -
New York, New York, New Jersey, New Jersey
2nd Brigade -
Maryland, Maryland, Maryland, Maryland
3rd Brigade -
Maryland, Pennsylvania Rifles, Pennsylvania, Pennsylvania
4th Brigade -
Pennsylvania, Pennsylvania, Pennsylvania, Pennsylvania 288 men
Southern Division
1st Brigade (at 24 figures each) -
Virginia, Virginia, Virginia, Virginia
2nd Brigade (standard 18 figure units) -
Virginia, Virginia, Virginia, Virginia
3rd Brigade -
North Carolina, North Caronlina, North Carolina, North Carolina,
4th Brigade -
Delaware, South Carolina(Marion), South Carolina(Sumpter), Georgia(Pickens)312 men
Militia “Division”:
Northern Brigade -
Connecticut Militia, Rhode Island Militia, New Hampshire Militia, Massachusetts Militia
Central Brigade -
New York Militia, New Jersey Militia, Pennsylvania Militia, Maryland Militia
Southern Brigade -
Delaware Militia, Virginia Militia (Morgan’s Rifles), North Carolina Militia-rifles, South Carolina Militia 216 men
Legionary Corps:
Lee’s Legion Foot, Armand’s Legion Foot 36 men
Franco-Spanish Division:
Spanish Brigade
Galvez’s Grenadiers, Louisiana Regiment, Havana Regiment, Louisiana Militia
Elite French Brigade
Grenadiers (Rochamabeau), Grenadiers (St. Simon), Chasseurs, Lauzan’s Lights
Rochambeau’s Brigade
Bourbonnois, Royal Deux-Ponts, Soissonois, Saintogne
St. Simon’s Brigade
Agenois, Gatinois, Touraine, Marines 288 men
Mounted Forces:
Continental -
1st Continental Light Dragoons, 2nd Continental Light Dragoons
3rd Continental Light Dragoons, 4th Continental Light Dragoons
Legionary and Other -
Lee’s Legion Troops, Armand’s Legion Troops
North Carolina Dragoons, Mounted Militia
Washinton’s Life Guard with Von Heer’s Provost Corps, Philadelphia Light Horse
French -
St. Simon’s (Belzunc) Dragoons, Lauzan’s Hussars 144 men
Artillery:
24 guns, 24 four man crews
16 Continental, 4 Militia, 4 French 96 men
Other:
Corps of Invalids (18 figures - ammo distribution, etc)
Horse Holders (4 men, 8 horses - four bases)
Scouts (12 men, 6 horses - six bases)
Male Camp Followers (15 figures)
Female Camp Followers (15 figures) ....64 men and women, 14 horses
49 men, 15 women, 14 horses
Command Figures:
(50 Generals)
CinC - 4 sets (Mounted officer plus standard bearer on foot)
Washington and three alternates (Greene, Gates, Rochamabeu or Lee(?))
Wing Command - 6 sets (Mounted officer plus musician - drum or fife - on foot)
Allows alternates
Division Command - 10 sets (Mounted officer plus officer on foot)
Six “Divisions” plus allows alternates
Brigade Command - 24 sets (Mounted officer plus soldier ranker on foot)
One per brigade
Cavalry Brigade Command - 6 sets (Mounted officer plus bugler on foot)
One per brigade 99 men, 1 woman, 50 horses (the woman? a mistress for one of the French generals!)
24 guns, 144 dismounts, 144 casualties, 194 horses = 506
24 guns, 144 dismounts, 144 casualties, 194 horses = 506
_____
Notes:
Larger continental units (24 figures) represent larger representation from those states
Legionary corps not brigaded - unattached
Continental units not given specific designation in list but will be painted to match specific units and given names at a later date on this list
Named officers will be assigned to all brigades following, within reason, historical figures
This list follows history in general but is meant to allow fun games, either historical or - and more likely - a fictional narrative campaign
Casualties assigned at the rate of one per 18 man unit (2 for 24 man units), one per mounted unit, and one per gun and crew
Unless otherwise noted, all foot units are 18 figures and all mounted units are 12 figures which include matching dismounted figures
BRITISH AND ALLIED
Elite British Division:
Guards Brigade -
First Guards with Grenadiers (24 figures), Second Guards with Light Infantry (24 figures)
Grenadiers Brigade -
1st Grenadiers, 2nd Grenadiers
Light Infantry Brigade -
1st Light Infantry, 2nd Light Infantry
First Highland Brigade -
42nd Highlanders, 76th Highlanders (24 figures), Highland Grenadiers
Second Highland Brigade -
1st/71st Battalion, 2nd/71st Battalion, Highland Light Infantry
British Line Division:
1st Brigade -
4th Foot, 5th Fusiliers (24 figures), 23rd Fusiliers (24 figures), 49th Foot
2nd Brigade (2 flags) -
10th Foot, 27th Foot, 28th Foot, 40th Foot
3rd Brigade (2 flags, flopply hats) -
15th Foot, 33rd Foot, 44th Foot, 55th Foot
4th Brigade -
17th Foot, 37th Foot, 46th Foot, 64th Foot
Burgoyne’s Command:
British Advanced Corps -
Grenadiers, Light Infantry, 24th Foot
British Line Brigade (campaign helmets) -
9th Foot, 20th Foot, 21st Fusiliers, 62nd Foot
German Advanced Corps -
von Breyman’s Grenadiers, von Barner’s Chasseurs, Gersau’s Jaegers
German Line Brigade -
Erbprinz (Hesse Hanau), Specth, Riedesel, Rhetz
Loyalists -
King’s Loyal Americans, Queen’s Loyal Rangers
King’s Royal Regiment of New York, Butler’s Rangers - both with St. Leger
First German Division:
Jaeger Corps -
1st and 2nd Jaeger Companies (24 figures), 3rd and 4th Jaeger Companies (24 figures)
5th Jaeger Company (12 figures), 6th Jaeger Company (12 figures - Ansbach-Bayreuth)
Mirbach’s Brigade (Trenton) -
von Lossberg Fusiliers, von Knyphausen Fusiliers, von Rall Grenadiers
Donop’s Brigade -
Minnegerode Grenadiers, Von Block Grenadiers, von Linsingen Grenadiers (24)
Second German Division:
Stirn’s Brigade -
von Donop’s Musketeers, von Mirbach Musketeers (24), Erbprinz Fusiliers
Lossberg Brigade -
Prinz Karl Musketeers (24), von Trumbach Musketeers (24), von Ditfurth Fusiliers
Garrison Brigade -
Landgraf Musketeers, von Huyn Garrison Regiment, von Stein Garrison Regiment
Loyalist Division:
1st Brigade -
British Legion Foot, Queen’s Rangers Line, Queen’s Rangers “Flank”, North Carolina Highlanders with Ferguson’s Rifles
2nd Brigade -
1st New Jersey Volunteers, 2nd New Jersey Volunteers, 3rd New Jersey Volunteers, Provincial Light Infantry
3rd Brigade -
1st DeLancey’s, 2nd DeLancey’s, New York Volunteers, King’s Orange Rangers
4th Brigade -
Prince of Wales Regiment, Volunteers of Ireland, Royal Highland Emigrants, King’s American Rifles
Mounted Forces:
British -
16th Light Dragoons, 17th Light Dragoons, Mounted Highlanders
German -
Mounted Jaegers, Prinz Ludwig’s Dragoons (Brunswick)
Loyalist -
British Legion with Light Dragoon detachment, Queen’s Rangers Dragoons and Hussars, King’s American Dragoons
Artillery:
20 guns, 20 four man crews
12 British, 4 German, 4 Loyalist
Other:
Pioneers (12 figures)
Horse Holders (2 men, 4 horses - two bases)
Scouts (12 men, 6 horses - six bases) ....26 men, 10 horses
Command Figures:
(46 Generals)
CinC - 4 sets (Mounted officer plus standard bearer on foot)
Howe and three alternates: Burgoyne, Cornwallis, and Clinton or Heister (Knyphausen?).
Wing Command - 5 sets (Mounted officer plus musician - drum or fife - on foot)
Allows alternates
Division Command - 9 sets (Mounted officer plus officer on foot)
Six “Divisions” plus allows alternates
Brigade Command - 24 sets (Mounted officer plus soldier ranker on foot)
One per brigade
Cavalry Brigade Command - 4 sets (Mounted officer plus bugler on foot)
One per brigade
_____
Notes:
Facing colors to be added to list at some point
Named officers will be assigned to all brigades following, within reason, historical figures
This list follows history in general but is meant to allow fun games, either historical or - and more likely - a fictional narrative campaign
Casualties assigned at the rate of one per 18 man unit (2 for 24 man units), one per mounted unit, and one per gun and crew
Unless otherwise noted, all foot units are 18 figures and all mounted units are 12 figures which include matching dismounted figures
660 British foot figures 80 gun crew
492 German foot figures 26 other
360 Loyalist foot figures
1,512 Foot figures 46 mounted officers, 46 foot staff
36 British mounted figures
24 German mounted figures
36 Loyalist mounted figures
96 mounted troopers
1,806 British and allied
20 guns, 96 dismounts, 120 casualties, 142 horses = 378 + 1806 = 2184 total pieces
February 25, 2014
One of the joys of this period is the continuing research that enhances knowledge - and then adjusts the collection of figures. And even after we 'complete' a collection, we can find new figures that we 'just have to have'. Or a new range appears and we decide to sample it. Well, this post is a result of all three of those factors. Actually, we could add a fourth element of a 'disappeared' range re-appearing.
The new information comes from here: http://www.military-historians.org/company/journal/guards/guards.htm
Not new information in the world, but more detailed information than I'd had prior to finding that information. And while I've sampled the newer range of Peter Pig figures and have added two new units of foot militia (each with 18 unique sculpts - though duplicates across the two units) and one mounted unit of militia with dismounts, a new unit of highlanders in trousers and a new unit of jaegers, plus a unit of supply troops (using the extra and out of ammo figures), and two groups of civilains - men and women, plus three packs of artillerists (ragged, round hat, and german), and a delightful grouping of scout figures (both mounted and foot), plus plenty of additional casualty figures (which I really needed, the others were only wants), I'm going to dip into a different source for reforming my foot guard in a more historical organization.
And that source is the re-emergent Polly Oliver range of figures for this era. I used to drool over those figures but then they dropped away before I started buying for the period. Now I can get some just to have some. I will, absolutely, get some of their fusilier figures - I know they probably didn't wear those hats on campaign in America. But sometimes we collect figures just because; certainly the case in this instance.
These additions do mean I have to dive back into all of my collected resources - and maybe add to those resources! - to sort out how to incorporate all of this into my already much too large collection. All of this rather flies in the face of my clear need to down size my overall collection of figures just to achieve some level of sanity. But, since the American Revolution is my favorite period and the one I'd keep if I kept only one (will almost certainly keep a minimum of four periods - assuming I can actually talk myself in to downsizing at all) then I'm calling this augmentation 'no harm, no foul'.
As to the redesign of the guards, I'm thinking to have it as one unit in two battalions of 15 figures each. One stand of grenadiers and four stands of foot (including command) for one battalion and then one stand of lights and four stands of foot (again with command) for the other battalion. I can use the grenadiers and light troops I already have and then would only need to pick one pack of Polly Oliver figures to get the 24 figures I'd need for the 'hat' companies - and split the command up between the battalions.
That leaves those two battalions I'd had planned as my guard units as 'orphans' but I will add a couple of packs (those fusiliers) to make another British foot brigade. And if I'm going to delve this deep into making changes, I'll certainly do a bit more with Burgoyne's organization - the 24th will go back that way. I can see some changes for the Hessians - one brigade of musketeers, one brigade of fusiliers, one brigade of garrison troops, and one brigade of grenadiers - plus one for the formed grenadier unit as opposed to the converged battalions, and one 'brigade' of jaegers. Chances are I'll bring forward enough more French troops to have another line brigade.
Dang, I've gone and opened up a real can of worms for myself here, haven't I? None of the above even touches on adjustments on the continental side - except for the added militia, of course. Well, I guess I'll just have to get busy fishing for exactly how I want to do all this - in more detail. I guess we can put this down to the blessings - and the curses - of the internet. For me the silver lining is getting back to the design and organization side of the hobby, an element I really enjoy. Hazardous activity, though!
June 7, 2012
Okay, yes, I am reproducing in a public place potential evidence that I exist in an unbalanced mental state - but maybe we off balance folk are just having more fun! The evidence below.
If I had to abandon all put one of the many periods I have figures for - I'd shoot the person making such a dastardly suggestion! (maybe with a water gun, but I'd shoot the cad nonetheless) However, if I had to pick one period as my most favorite it'd probably be the American Revolution. The listing below reveals just how much I enjoy the period. Whether they will ever all get painted is another question all together.
Note that each battalion of infantry is eighteen figures and including command; each cavalry regiment consists of twelve mounted figures and twelve matching figures on foot; each gun is a model of a gun and four crewmen; all generals are represented by one mounted figure and one figure on foot - the foot figure indicating the rank of the general (who might not be an "actual" general, of course). For purposes of organization, I have everything in brigades of four battalions of infantry, two regiments of cavalry; the infantry brigades get a gun each and, of course, all the brigades get a commanding figure. And even though there were not divisions per se during this era, I have higher level "divisions" of four brigades each except for the two German ones which are three brigades each.
A couple of other things - I have some available alternative generals for the higher levels of command for various theaters and what if scenarios and/or campaigns. Also, while I list specific units - almost all of which I have a color image of to use as a guide when painting - any unit can be used as some other unit for historical scenarios. And a close examination will reveal I can cover all the theaters of the war. Lastly, one of the reasons for this list - and this blog - is evidence to support any insurance claim if some disaster were to befall my collection. (nasty shivering shudder typing that, I can tell you)
The Continental Side:
Northern Division -
1st Brigade: 2nd New Hampshire, Green Mountain Boys, 2nd Canadian, Sargent's Massachusetts
2nd Brigade: Patterson's Massachusetts, 3rd Massachusetts, 6th Massachusetts, 8th Massachusetts
3rd Brigade: 14th Massachusetts, 1st Connecticut, 8th Connecticut, 1st Rhode Island
Northern Militia: Battalion A-NH, Battalion B-Mass, Battalion C-Conn, Battalion D-R.Island
Central Division -
1st Brigade: 2nd New York, 3rd New York, 1779 New York, 1779 New Jersey
2nd Brigade: 3rd New Jersey, alternate 3rd New Jersey (2nd?), 7th Pennsylvania, 1779 Pennsylvania
3rd Brigade: 3rd Pennsylvania, 1st Maryland, 2nd Maryland, Haslet's Delaware
Central Militia: Battalion E-NY, Battalion F-NJ, Battalion G-Pennsy, Battalion H-Maryland
Southern Division -
1st Brigade: 6th Virginia, Virginia Marines (9th), 1779 Virginia Continentals, 1779 North Carolina
2nd Brigade: 2nd North Carolina, 3rd North Carolina, 1st South Carolina, 2nd South Carolina
3rd Brigade: 1st Georgia, Sumpter's Partisans, Marion's Partisans, Picken's Partisans
Southern Militia: Battalion I-Virginia, Battalion J-NC, Battalion K-SC, Battalion M-Georgia
Additional Continetnals and Western Division -
1st Brigade: Lee's, Henley's, Hartley's, Webb's Additional Continental Regiments
2nd Brigade: Sherburne's, Spencer's Additionals, Lee's Legion Foot, Pulaski's Legion Foot
3rd Brigade: Morgan's Rifles, Pennsylvania Rifles, Over-mountain Rifles, undecided Rifles
Western Brigade: Crockett's Battalion, Clark's Illinois Regiment, 8th Pennsylvania, 13th Virginia
Light Infantry and French Division -
First Light Infantry Brigade: 1st Lights, 2nd Lights, 3rd Lights, 4th Lights
Second Light Infantry Brigade: 5th Ligths, 6th Lights, 7th Lights, 8th Lights
French Elite Brigade: Soissons Grenadiers, Galvan's Grenadiers(spain), Chasseurs, Lauzan's Lights
French Foot Brigade: Saintonge, Royal Deux-Ponts, Bourbonnois, undecided (where's my Mollo?)
Cavalry Brigades:
1st and 2nd Continental Light Dragoons - two regiments
3rd and 4th Continental Light Dragoons - two regiments
Lee's Legion Cavalry and Pulaski's Legion Cavalry - two regiments
Philadelphia Light Horse and Washington's Life Guard with von Heer's Corps attached - two regiments
Lauzan's Hussars and Belzunc Dragoons - two regiments
The British Side:
Elite British Division:
Guard's Brigade: 1st Guards, 2nd Guards, Converged Guards Flankers Battalion, 24th Foot
Grenadier Brigade: 1st Grenadiers, 2nd Grenadiers, Highland Grenadiers, undecided Grenadiers
Light Infantry Briagde: 1st Light Infantry, 2nd Light Infantry, Highland Lights, Burgoyne's Lights
Highland Brigade: 42nd Foot, 1st of the 71st, 2nd of the 71st, Royal Highland Emigrants (provincials)
British Line Division:
1st Line Brigade: 33rd Foot, 37th Foot, 43rd Foot, 64th Foot
2nd Line Brigade: 4th Foot, 10th Foot, 35th Foot, 63rd Foot
3rd Line Brigade: 17th Foot, 23rd Fusiliers, 40th Foot, 49th Foot
Burgoyne's Brigade: 9th Foot, 20th Foot, 21st Fusiliers, 62nd Foot
Elite German Division:
Grenadier Brigade: von Linsigen Grend, von Minnegerode Grend, von Rall Grend, Burgoyne's Grend
Light Brigade: Hess Jaegers, Hess and Others Jaegers, von Barner's Chasseurs, Burgoyne's Jaegers
Brunswick Brigade: Erbprinz (H-Hanau), Riedesel Musk, Specht Musk, Rhetz Musketeers
German Line Division:
First Musketter Brigade: von Trumbach, Prinz Carl, von Donop, von Mirbach
Second Musketeer Brigade: Brandenburg, Anspach, Waldeck, von Huyn Garrison Regt.
Fusilier Brigade: von Ditfurth, Erbprinz(H-Cassel), von Lossberg, von Kyphausen
Loyalist Division:
Northern Loyalists: Delancey's, King's American Regiment, NJ Volunteers, Prince of Wales
Central Loyalists: New York Volunteers, Volunteers of Ireland, Tory Militia, Tory Militia
Southern Loyalists: Queen's Rangers Foot, British Legion Foot, QR & Ferguson Rifles, NC Highland
Burgoyne's Loyalists: Butler's Rangers, King's Orange Rangers, Loyal Rangers, Kings Loyal Regt/NY
Cavalry Brigades:
16th and 17th Light Dragoons - two regiments
Mounted Highlanders and King's American Dragoons - two regiments
British Legion Cavalry and Queen's Rangers Cavalry - two regiments
Mounted Jaegers and Prinze Ludwig Dragoons - two regiments.
-----------
Yes, I know some of the cavalry were not in regimental strength but I wanted more cavalry than is usual - for hypothetical events I want to game one day.
Now I need to start deciding on what generals I want to represent - besides the obvious. And one last thing to add - with the addition of two dozen more casualty figures, I will have one casualty figure for every unit, each infantry battalion, each cavalry regiment, and each artillery piece; these will be used as indicators using my own unique system that I'll share one day. More later, pictures probably a lot later - unless you want to see unpainted figures.
Oh, for those who care, the vast majority - but not all - of the infantry comes from Musket Miniatures and the vast majority of the cavalry - but, again, not all - comes from Freikorps courtesy of QRF (and, thanks Geoff, for the help).
While editing, these thoughts - yes, I actually already own all these figures (just need the mentioned casualty figures). And I tried to balance the Continental figures to match, to some degree, the proportions each state supplied.
No comments:
Post a Comment